
การใช้งาน ESP32-CAM กล้อง OV2640 เป็น Video Stream ภาพเคลื่อนไหว แสดงผลขึ้นหน้าเว็บผ่าน WiFi เป็นการทำงานแบบ Station (STA) Mode เป็นโหมดที่กำหนดให้ ESP32 ไปเชื่อมต่อกับอุปกรณ์อื่น ๆ เช่น เร้าเตอร์ แล้วรับส่งข้อมูลระหว่างเครื่องในวงแลนได้ โดยที่ใช้ ESP32 เป็น Server Controller
..
### อุปกรณ์ที่ใช้ ###
1. ESP32-CAM ESP32 Development Board with Camera Module
2. CP2102 USB 2.0 to UART TTL 5PIN Connector Module
3. Jumper (F2F) 10cm Female to Female
โดยการทำงานมีขั้นตอนดังนี้
1.ติดตั้ง Arduino core for ESP32
ลิงค์การติดตั้ง Arduino core for ESP32
https://robotsiam.blogspot.com/2017/09/arduino-core-for-esp32.html
2.เชื่อมต่ออุปกรณ์
2.1 เชื่อมต่อ ESP32-CAM กับ กล้อง OV2640

2.2 เชื่อมต่อ ESP32-CAM กับ CP2102 USB to UART TTL


3.อัพโหลดโค้ด
3.1 เชื่อมต่อ CP2102 USB เข้ากับคอมพิวเตอร์

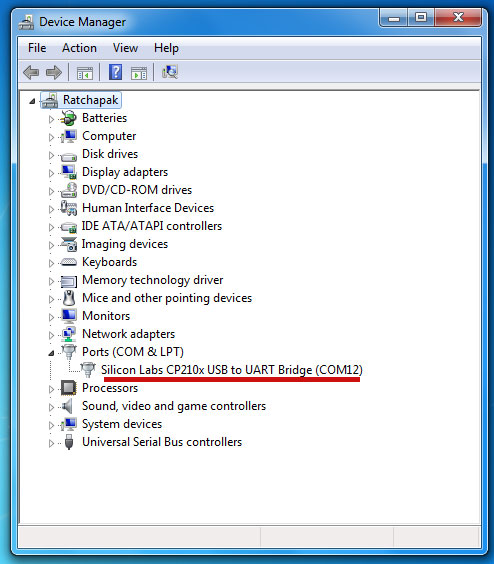
3.2 ตรวจสอบการติดตั้งไดร์เวอร์ ของ CP2102 USB
3.2.1 คลิกขวา Computet -> Properties

3.2.2 คลิกที่ Device Manager

3.2.3 ที่ Ports (COM & LPT) จะพบ การติดตั้งไดร์เวอร์ ของ CP2102 USB ในตัวอย่างเป็น "COM12"

3.2.4 เปิดโปรแกรม Arduino (IDE) และ ก็อปปี้ โค้ดด้านล่างนี้ ไปวางไว้ในส่วนเขียนโปรแกรม
/*********
  Rui Santos
  Complete project details at https://RandomNerdTutorials.com

  IMPORTANT!!!
   - Select Board "ESP32 Wrover Module"
   - Select the Partion Scheme "Huge APP (3MB No OTA)
   - GPIO 0 must be connected to GND to upload a sketch
   - After connecting GPIO 0 to GND, press the ESP32-CAM on-board RESET button to put your board in flashing mode

  Permission is hereby granted, free of charge, to any person obtaining a copy
  of this software and associated documentation files.

  The above copyright notice and this permission notice shall be included in all
  copies or substantial portions of the Software.
*********/

#include "esp_camera.h"
#include <WiFi.h>
#include "esp_timer.h"
#include "img_converters.h"
#include "Arduino.h"
#include "fb_gfx.h"
#include "soc/soc.h" //disable brownout problems
#include "soc/rtc_cntl_reg.h"  //disable brownout problems
#include "dl_lib.h"
#include "esp_http_server.h"

//Replace with your network credentials
const char* ssid = "REPLACE_WITH_YOUR_SSID";
const char* password = "REPLACE_WITH_YOUR_PASSWORD";

#define PART_BOUNDARY "123456789000000000000987654321"

// This project was tested with the AI Thinker Model, M5STACK PSRAM Model and M5STACK WITHOUT PSRAM
#define CAMERA_MODEL_AI_THINKER
//#define CAMERA_MODEL_M5STACK_PSRAM
//#define CAMERA_MODEL_M5STACK_WITHOUT_PSRAM

// Not tested with this model
//#define CAMERA_MODEL_WROVER_KIT

#if defined(CAMERA_MODEL_WROVER_KIT)
  #define PWDN_GPIO_NUM    -1
  #define RESET_GPIO_NUM   -1
  #define XCLK_GPIO_NUM    21
  #define SIOD_GPIO_NUM    26
  #define SIOC_GPIO_NUM    27

  #define Y9_GPIO_NUM      35
  #define Y8_GPIO_NUM      34
  #define Y7_GPIO_NUM      39
  #define Y6_GPIO_NUM      36
  #define Y5_GPIO_NUM      19
  #define Y4_GPIO_NUM      18
  #define Y3_GPIO_NUM       5
  #define Y2_GPIO_NUM       4
  #define VSYNC_GPIO_NUM   25
  #define HREF_GPIO_NUM    23
  #define PCLK_GPIO_NUM    22

#elif defined(CAMERA_MODEL_M5STACK_PSRAM)
  #define PWDN_GPIO_NUM     -1
  #define RESET_GPIO_NUM    15
  #define XCLK_GPIO_NUM     27
  #define SIOD_GPIO_NUM     25
  #define SIOC_GPIO_NUM     23

  #define Y9_GPIO_NUM       19
  #define Y8_GPIO_NUM       36
  #define Y7_GPIO_NUM       18
  #define Y6_GPIO_NUM       39
  #define Y5_GPIO_NUM        5
  #define Y4_GPIO_NUM       34
  #define Y3_GPIO_NUM       35
  #define Y2_GPIO_NUM       32
  #define VSYNC_GPIO_NUM    22
  #define HREF_GPIO_NUM     26
  #define PCLK_GPIO_NUM     21

#elif defined(CAMERA_MODEL_M5STACK_WITHOUT_PSRAM)
  #define PWDN_GPIO_NUM     -1
  #define RESET_GPIO_NUM    15
  #define XCLK_GPIO_NUM     27
  #define SIOD_GPIO_NUM     25
  #define SIOC_GPIO_NUM     23

  #define Y9_GPIO_NUM       19
  #define Y8_GPIO_NUM       36
  #define Y7_GPIO_NUM       18
  #define Y6_GPIO_NUM       39
  #define Y5_GPIO_NUM        5
  #define Y4_GPIO_NUM       34
  #define Y3_GPIO_NUM       35
  #define Y2_GPIO_NUM       17
  #define VSYNC_GPIO_NUM    22
  #define HREF_GPIO_NUM     26
  #define PCLK_GPIO_NUM     21

#elif defined(CAMERA_MODEL_AI_THINKER)
  #define PWDN_GPIO_NUM     32
  #define RESET_GPIO_NUM    -1
  #define XCLK_GPIO_NUM      0
  #define SIOD_GPIO_NUM     26
  #define SIOC_GPIO_NUM     27

  #define Y9_GPIO_NUM       35
  #define Y8_GPIO_NUM       34
  #define Y7_GPIO_NUM       39
  #define Y6_GPIO_NUM       36
  #define Y5_GPIO_NUM       21
  #define Y4_GPIO_NUM       19
  #define Y3_GPIO_NUM       18
  #define Y2_GPIO_NUM        5
  #define VSYNC_GPIO_NUM    25
  #define HREF_GPIO_NUM     23
  #define PCLK_GPIO_NUM     22
#else
  #error "Camera model not selected"
#endif

static const char* _STREAM_CONTENT_TYPE = "multipart/x-mixed-replace;boundary=" PART_BOUNDARY;
static const char* _STREAM_BOUNDARY = "\r\n--" PART_BOUNDARY "\r\n";
static const char* _STREAM_PART = "Content-Type: image/jpeg\r\nContent-Length: %u\r\n\r\n";

httpd_handle_t stream_httpd = NULL;

static esp_err_t stream_handler(httpd_req_t *req){
  camera_fb_t * fb = NULL;
  esp_err_t res = ESP_OK;
  size_t _jpg_buf_len = 0;
  uint8_t * _jpg_buf = NULL;
  char * part_buf[64];

  res = httpd_resp_set_type(req, _STREAM_CONTENT_TYPE);
  if(res != ESP_OK){
    return res;
  }

  while(true){
    fb = esp_camera_fb_get();
    if (!fb) {
      Serial.println("Camera capture failed");
      res = ESP_FAIL;
    } else {
      if(fb->width > 400){
        if(fb->format != PIXFORMAT_JPEG){
          bool jpeg_converted = frame2jpg(fb, 80, &_jpg_buf, &_jpg_buf_len);
          esp_camera_fb_return(fb);
          fb = NULL;
          if(!jpeg_converted){
            Serial.println("JPEG compression failed");
            res = ESP_FAIL;
          }
        } else {
          _jpg_buf_len = fb->len;
          _jpg_buf = fb->buf;
        }
      }
    }
    if(res == ESP_OK){
      size_t hlen = snprintf((char *)part_buf, 64, _STREAM_PART, _jpg_buf_len);
      res = httpd_resp_send_chunk(req, (const char *)part_buf, hlen);
    }
    if(res == ESP_OK){
      res = httpd_resp_send_chunk(req, (const char *)_jpg_buf, _jpg_buf_len);
    }
    if(res == ESP_OK){
      res = httpd_resp_send_chunk(req, _STREAM_BOUNDARY, strlen(_STREAM_BOUNDARY));
    }
    if(fb){
      esp_camera_fb_return(fb);
      fb = NULL;
      _jpg_buf = NULL;
    } else if(_jpg_buf){
      free(_jpg_buf);
      _jpg_buf = NULL;
    }
    if(res != ESP_OK){
      break;
    }
    //Serial.printf("MJPG: %uB\n",(uint32_t)(_jpg_buf_len));
  }
  return res;
}

void startCameraServer(){
  httpd_config_t config = HTTPD_DEFAULT_CONFIG();
  config.server_port = 80;

  httpd_uri_t index_uri = {
    .uri       = "/",
    .method    = HTTP_GET,
    .handler   = stream_handler,
    .user_ctx  = NULL
  };

  //Serial.printf("Starting web server on port: '%d'\n", config.server_port);
  if (httpd_start(&stream_httpd, &config) == ESP_OK) {
    httpd_register_uri_handler(stream_httpd, &index_uri);
  }
}

void setup() {
  WRITE_PERI_REG(RTC_CNTL_BROWN_OUT_REG, 0); //disable brownout detector

  Serial.begin(115200);
  Serial.setDebugOutput(false);

  camera_config_t config;
  config.ledc_channel = LEDC_CHANNEL_0;
  config.ledc_timer = LEDC_TIMER_0;
  config.pin_d0 = Y2_GPIO_NUM;
  config.pin_d1 = Y3_GPIO_NUM;
  config.pin_d2 = Y4_GPIO_NUM;
  config.pin_d3 = Y5_GPIO_NUM;
  config.pin_d4 = Y6_GPIO_NUM;
  config.pin_d5 = Y7_GPIO_NUM;
  config.pin_d6 = Y8_GPIO_NUM;
  config.pin_d7 = Y9_GPIO_NUM;
  config.pin_xclk = XCLK_GPIO_NUM;
  config.pin_pclk = PCLK_GPIO_NUM;
  config.pin_vsync = VSYNC_GPIO_NUM;
  config.pin_href = HREF_GPIO_NUM;
  config.pin_sscb_sda = SIOD_GPIO_NUM;
  config.pin_sscb_scl = SIOC_GPIO_NUM;
  config.pin_pwdn = PWDN_GPIO_NUM;
  config.pin_reset = RESET_GPIO_NUM;
  config.xclk_freq_hz = 20000000;
  config.pixel_format = PIXFORMAT_JPEG;

  if(psramFound()){
    config.frame_size = FRAMESIZE_UXGA;
    config.jpeg_quality = 10;
    config.fb_count = 2;
  } else {
    config.frame_size = FRAMESIZE_SVGA;
    config.jpeg_quality = 12;
    config.fb_count = 1;
  }

  // Camera init
  esp_err_t err = esp_camera_init(&config);
  if (err != ESP_OK) {
    Serial.printf("Camera init failed with error 0x%x", err);
    return;
  }
  // Wi-Fi connection
  WiFi.begin(ssid, password);
  while (WiFi.status() != WL_CONNECTED) {
    delay(500);
    Serial.print(".");
  }
  Serial.println("");
  Serial.println("WiFi connected");

  Serial.print("Camera Stream Ready! Go to: http://");
  Serial.print(WiFi.localIP());

  // Start streaming web server
  startCameraServer();
}

void loop() {
  delay(1);
}
3.2.5 แก้ไขโค้ด
ก่อนการอัพโหลดต้องแก้ไขโค้ด ตามเครือข่าย WiFi ที่เลือกใช้งาน โดย
"REPLACE_WITH_YOUR_SSID" คือ ชื่อWiFiที่ต้องการเชื่อมต่อ
"REPLACE_WITH_YOUR_PASSWORD" คือ รหัสผ่าน
ตรวจความถูกต้องแบบละเอียด เช่น...ตัวพิมพ์เล็ก , ตัวพิมพ์ใหญ่ อักขระต่างๆ ให้ถูกต้อง


3.2.7 ไปที่ Tools -> Partition Scheme แล้วเลือก Huge APP(3MB No OTA)

ในตัวอย่างเลือกเป็น "COM12"

 เพื่ออัพโหลด
ตั้งชื่อไฟล์ -> Save โปรแกรม จะทำการ อัพโหลด

3.2.10 หากสามารถอัพโหลดโปรแกรมลงบอร์ดได้สำเร็จ จะแสดงคำว่า Done uploading. ที่แถบด้านล่าง

### ถ้ามีปัญหาในการอัพโหลดไม่ได้ ให้กดปุ่ม RST ค้างไว้ในขณะอัพโหลด ###

4.1 เปิดหน้าต่าง Serial Monitor โดยไปที่ Tools > Serial Monitor


4.3 ถอด Jumper ที่เชื่อมต่อระหว่าง IO0 <-> GND ออก
(ถ้าต้องการอัพโหลดโค้ดให้เชื่อมต่อ กลับเข้าที่เดิม)

4.4 กดที่ปุ่ม RST 1 ครั้ง เพื่อเริ่มการทำงาน ของ ESP32-CAM
4.5 รอจนกระทั่งที่ Serial Monitor แสดง IP ของ ESP32-CAM ในตัวอย่างนี้คือ 192.168.1.38

ใช้ คอมพิวเตอร์ หรือ สมาร์ทโฟน ที่เชื่อมต่อเครือข่าย WiFi เดียวกันกับ ESP32-CAM แล้วเปิดเว็บบราวเซอร์ ที่ URL ป้อนไอพี ที่ได้มาจากข้อ 4.5 ในตัวอย่างนี้คือ 192.168.1.38
พัฒนาเป็น กล้องวงจรปิด WiFi
credit :
credit :
https://randomnerdtutorials.com/esp32-cam-video-streaming-web-server-camera-home-assistant/
สามารถพัฒนาต่อเป็น : ESP32-Cam กล้องถ่ายรูป Save ลง micro SD Card
https://randomnerdtutorials.com/esp32-cam-take-photo-save-microsd-card/
espหาwifiไม่เจอค่ะ
ตอบลบ